In this blog post, we delve into the dynamic world of product pricing, exploring the intriguing scenario where a single product can have multiple prices. Our focus is on ensuring that every customer is presented with the price that aligns perfectly with their specific requirements.
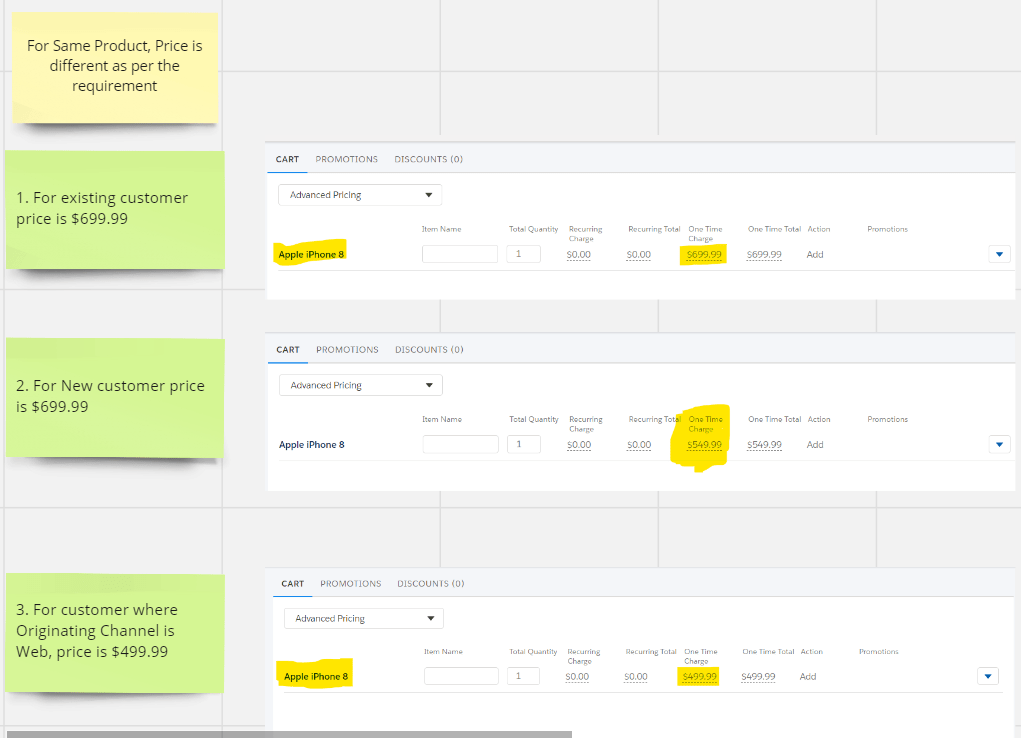
Scenario : A product can have multiple prices, so in this post we ensure that each customer sees the price that is right for them based on the requirement. For instance, see the below image

Step 1 : Find the product for which you need to create multiple prices, once the product is opened, Click the Pricing facet in the left sidebar and create a New price list entry as shown in the screenshot below.

Step 2 : To edit the New account pricing entry, click the edit icon next to it. On the right, scroll to the top of the price list entry dialogue and click CONTEXT RULES, then Add Rule Set. In the previous post, we discussed how to create a rule set that displays different prices for accounts with the status “new.” Select the New Accounts Rule Set from the Add Rule Set dialogues.

In this step, we assigned the rule set to the Product price list for the scenario of showing the price of the product when a new customer is about to purchase the product.
Step 3 : Now we must create a rule set for the scenario in which the customer will purchase a product through the Web as the Originating Channel.
Step 4 : To create a Rule, we use the same method as described in the previous post. We must create CONTEXT SCOPES, CONTEXT DIMENSION, CONTEXT MAPPING, CONTEXT RULE, RULE CONDITIONS, RULE SET, and Web condition. The screenshot below shows the rule condition where we set the condition if Operating channel == Web.

Step 5 : After creating this context rule, we must associate it with the price list. Click on Price list and then on the name of the B2C Price List or the Edit icon to open the B2C Price List for editing. Click the Hierarchy facet in the left sidebar.

Step 6 : Navigate to the Web Channel Price List. Click the Price List Entries facet in the left sidebar, then new, and set the Pricing Element value to $499.99 OT.

Step 7 : Click the Context Rules facet in the left sidebar. Select Add Rule Set from the Context Rules menu. Click Select next to Web Channel Rule Set after entering web in the Vlocity Rule Lookup dialogue box. Click Save in the Add Rule Set dialogue box.

Step 8 : Now that everything is ready to test, we can do so by adding the same product to three customers: one who is already a customer, one who is a new customer with a status of “New,” and the last one whose originating channel is the web.
Hope this information helps you guys.
Stay tuned for the next post, in which we’ll go into more detail about pricing scenarios in bundled products.
Cheers!!!
Mukul Sharma

Cheers Akeel Wani 0484638334
LikeLike